我们在springcloud(七):配置中心svn示例和refresh中讲到,如果需要客户端获取到最新的配置信息需要执行refresh,我们可以利用webhook的机制每次提交代码发送请求来刷新客户端,当客户端越来越多的时候,需要每个客户端都执行一遍,这种方案就不太适合了。使用Spring Cloud Bus可以完美解决这一问题。
Spring Cloud Bus
Spring cloud bus通过轻量消息代理连接各个分布的节点。这会用在广播状态的变化(例如配置变化)或者其他的消息指令。Spring bus的一个核心思想是通过分布式的启动器对spring boot应用进行扩展,也可以用来建立一个多个应用之间的通信频道。目前唯一实现的方式是用AMQP消息代理作为通道,同样特性的设置(有些取决于通道的设置)在更多通道的文档中。
Spring cloud bus被国内很多都翻译为消息总线,也挺形象的。大家可以将它理解为管理和传播所有分布式项目中的消息既可,其实本质是利用了MQ的广播机制在分布式的系统中传播消息,目前常用的有Kafka和RabbitMQ。利用bus的机制可以做很多的事情,其中配置中心客户端刷新就是典型的应用场景之一,我们用一张图来描述bus在配置中心使用的机制。
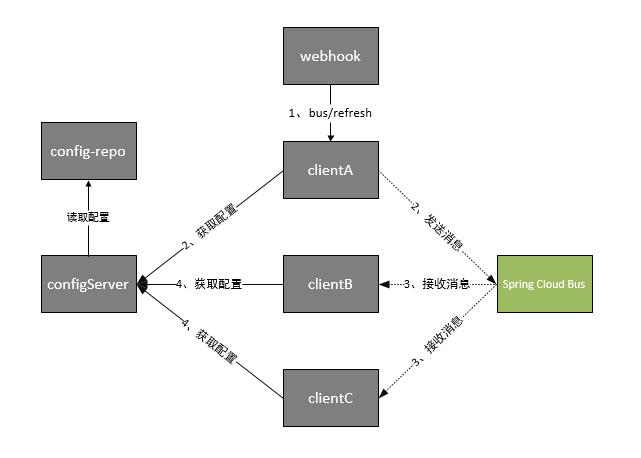
根据此图我们可以看出利用Spring Cloud Bus做配置更新的步骤:
- 1、提交代码触发post给客户端A发送bus/refresh
- 2、客户端A接收到请求从Server端更新配置并且发送给Spring Cloud Bus
- 3、Spring Cloud bus接到消息并通知给其它客户端
- 4、其它客户端接收到通知,请求Server端获取最新配置
- 5、全部客户端均获取到最新的配置
项目示例
我们选择上一篇文章springcloud(八):配置中心服务化和高可用版本的示例代码来改造,MQ我们使用RabbitMQ来做示例。
客户端spring-cloud-config-client改造
1、添加依赖
<dependency>
    <groupId>org.springframework.cloud</groupId>
    <artifactId>spring-cloud-starter-bus-amqp</artifactId>
</dependency>
需要多引入spring-cloud-starter-bus-amqp包,增加对消息总线的支持
2、配置文件
## 刷新时,关闭安全验证
management.security.enabled=false
## 开启消息跟踪
spring.cloud.bus.trace.enabled=true

spring.rabbitmq.host=192.168.9.89
spring.rabbitmq.port=5672
spring.rabbitmq.username=admin
spring.rabbitmq.password=123456
配置文件需要增加RebbitMq的相关配置,这样客户端代码就改造完成了。
3、测试
依次启动spring-cloud-eureka、spring-cloud-config-server、spring-cloud-config-client项目,在启动spring-cloud-config-client项目的时候我们会发现启动日志会输出这样的一条记录。
2017-05-26 17:05:38.568 INFO 21924 --- [ main] o.s.b.a.e.mvc.EndpointHandlerMapping : Mapped "{[/bus/refresh],methods=[POST]}" onto public void org.springframework.cloud.bus.endpoint.RefreshBusEndpoint.refresh(java.lang.String)
说明客户端已经具备了消息总线通知的能力了,为了更好的模拟消息总线的效果,我们更改客户端spring-cloud-config-client项目的端口为8003、8004依次启动,这样测试环境就准备好了。启动后eureka后台效果图如下:

我们先分别测试一下服务端和客户端是否正确运行,访问:http://localhost:8001/neo-config/dev,返回信息:
{
    "name": "neo-config",
    "profiles": [
        "dev"
    ],
    "label": null,
    "version": null,
    "state": null,
    "propertySources": [
        {
            "name": "https://github.com/ityouknow/spring-cloud-starter/config-repo/neo-config-dev.properties",
            "source": {
                "neo.hello": "hello im dev"
            }
        }
    ]
}
说明server端都正常读取到了配置信息。
依次访问:http://localhost:8002/hello、http://localhost:8003/hello、http://localhost:8004/hello,返回:hello im dev。说明客户端都已经读取到了server端的内容。
现在我们更新neo-config-dev.properties 中neo.hello的值为hello im dev update并提交到代码库中,访问:http://localhost:8002/hello 依然返回hello im dev。我们对端口为8002的客户端发送一个/bus/refresh的post请求。在win下使用下面命令来模拟webhook.
curl -X POST http://localhost:8002/bus/refresh
执行完成后,依次访问:http://localhost:8002/hello、http://localhost:8003/hello、http://localhost:8004/hello,返回:hello im dev update。说明三个客户端均已经拿到了最新配置文件的信息,这样我们就实现了图一中的示例。
改进版本
在上面的流程中,我们已经到达了利用消息总线触发一个客户端bus/refresh,而刷新所有客户端的配置的目的。但这种方式并不优雅。原因如下:
- 打破了微服务的职责单一性。微服务本身是业务模块,它本不应该承担配置刷新的职责。
- 破坏了微服务各节点的对等性。
- 有一定的局限性。例如,微服务在迁移时,它的网络地址常常会发生变化,此时如果想要做到自动刷新,那就不得不修改WebHook的配置。
因此我们将上面的架构模式稍微改变一下
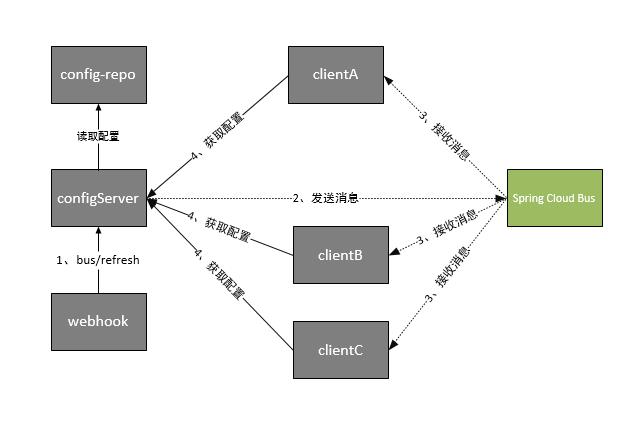
这时Spring Cloud Bus做配置更新步骤如下:
- 1、提交代码触发post请求给bus/refresh
- 2、server端接收到请求并发送给Spring Cloud Bus
- 3、Spring Cloud bus接到消息并通知给其它客户端
- 4、其它客户端接收到通知,请求Server端获取最新配置
- 5、全部客户端均获取到最新的配置
这样的话我们在server端的代码做一些改动,来支持bus/refresh
1、添加依赖
<dependencies>
	<dependency>
		<groupId>org.springframework.cloud</groupId>
		<artifactId>spring-cloud-config-server</artifactId>
	</dependency>
	<dependency>
		<groupId>org.springframework.cloud</groupId>
		<artifactId>spring-cloud-starter-bus-amqp</artifactId>
	</dependency>
	<dependency>
		<groupId>org.springframework.cloud</groupId>
		<artifactId>spring-cloud-starter-eureka</artifactId>
	</dependency>
</dependencies>
需要多引入spring-cloud-starter-bus-amqp包,增加对消息总线的支持
2、配置文件
server:
  port: 8001
spring:
  application:
    name: spring-cloud-config-server
  cloud:
    config:
      server:
        git:
          uri: https://github.com/ityouknow/spring-cloud-starter/     # 配置git仓库的地址
          search-paths: config-repo                             # git仓库地址下的相对地址,可以配置多个,用,分割。
          username: username                                        # git仓库的账号
          password: password                                    # git仓库的密码
  rabbitmq:
    host: 192.168.0.6
    port: 5672
    username: admin
    password: 123456

eureka:
  client:
    serviceUrl:
      defaultZone: http://localhost:8000/eureka/   ## 注册中心eurka地址


management:
  security:
     enabled: false
配置文件增加RebbitMq的相关配置,关闭安全验证。这样server端代码就改造完成了。
3、测试
依次启动spring-cloud-eureka、spring-cloud-config-server、spring-cloud-config-client项目,改动spring-cloud-config-client项目端口为8003、8004依次启动。测试环境准备完成。
按照上面的测试方式,访问server端和三个客户端测试均可以正确返回信息。同样修改neo-config-dev.properties 中neo.hello的值为hello im dev update并提交到代码库中。在win下使用下面命令来模拟webhook触发server端bus/refresh.
curl -X POST http://localhost:8001/bus/refresh
执行完成后,依次访问:http://localhost:8002/hello、http://localhost:8003/hello、http://localhost:8004/hello,返回:hello im dev update。说明三个客户端均已经拿到了最新配置文件的信息,这样我们就实现了上图中的示例。
其它
局部刷新
某些场景下(例如灰度发布),我们可能只想刷新部分微服务的配置,此时可通过/bus/refresh端点的destination参数来定位要刷新的应用程序。
例如:/bus/refresh?destination=customers:8000,这样消息总线上的微服务实例就会根据destination参数的值来判断是否需要要刷新。其中,customers:8000指的是各个微服务的ApplicationContext ID。
destination参数也可以用来定位特定的微服务。例如:/bus/refresh?destination=customers:**,这样就可以触发customers微服务所有实例的配置刷新。
跟踪总线事件
一些场景下,我们可能希望知道Spring Cloud Bus事件传播的细节。此时,我们可以跟踪总线事件(RemoteApplicationEvent的子类都是总线事件)。
跟踪总线事件非常简单,只需设置spring.cloud.bus.trace.enabled=true,这样在/bus/refresh端点被请求后,访问/trace端点就可获得类似如下的结果:
{
  "timestamp": 1495851419032,
  "info": {
    "signal": "spring.cloud.bus.ack",
    "type": "RefreshRemoteApplicationEvent",
    "id": "c4d374b7-58ea-4928-a312-31984def293b",
    "origin": "stores:8002",
    "destination": "*:**"
  }
  },
  {
  "timestamp": 1495851419033,
  "info": {
    "signal": "spring.cloud.bus.sent",
    "type": "RefreshRemoteApplicationEvent",
    "id": "c4d374b7-58ea-4928-a312-31984def293b",
    "origin": "spring-cloud-config-client:8001",
    "destination": "*:**"
  }
  },
  {
  "timestamp": 1495851422175,
  "info": {
    "signal": "spring.cloud.bus.ack",
    "type": "RefreshRemoteApplicationEvent",
    "id": "c4d374b7-58ea-4928-a312-31984def293b",
    "origin": "customers:8001",
    "destination": "*:**"
  }
}
这个日志显示了customers:8001发出了RefreshRemoteApplicationEvent事件,广播给所有的服务,被customers:9000和stores:8081接受到了。想要对接受到的消息自定义自己的处理方式的话,可以添加@EventListener注解的AckRemoteApplicationEvent和SentApplicationEvent类型到你自己的应用中。或者到TraceRepository类中,直接处理数据。
这样,我们就可清晰地知道事件的传播细节。
/bus/refresh BUG
/bus/refresh 有一个很严重的BUG,一直没有解决:对客户端执行/bus/refresh之后,挂到总线的上的客户端都会从Eureka注册中心撤销登记;如果对server端执行/bus/refresh,server端也会从Eureka注册中心撤销登记。再用白话解释一下,就是本来人家在Eureka注册中心注册的好好的,只要你对着它执行一次/bus/refresh,立刻就会从Euraka中挂掉。
其实这个问题挺严重的,本来你利用/bus/refresh给所有的节点来更新配置信息呢,结果把服务从Euraka中给搞掉了,那么如果别人需要调用客户端的服务的时候就直接歇菜了。不知道国内有童鞋公司在生产中用到这个功能没有,用了不就很惨烈。在网上搜索了一下,国内网友和国外网友都遇到过很多次,但是一直没有解决,很幸运就是我在写这篇文章的前三天,Netflix修复了这个问题,使用Spring Cloud最新版本的包就可以解决这个问题。由此也可以发现Spring Cloud还在快速的发展中,最新的版本可能也会有一些不稳定性,可见路漫漫而修远兮。
在pom中使用Spring Cloud的版本,解决这个bug.
<properties>
	<project.build.sourceEncoding>UTF-8</project.build.sourceEncoding>
	<project.reporting.outputEncoding>UTF-8</project.reporting.outputEncoding>
	<java.version>1.8</java.version>
	<spring-cloud.version>Dalston.SR1</spring-cloud.version>
</properties>
主要是这句:<spring-cloud.version>Dalston.SR1</spring-cloud.version> ,详情可以参考本文示例中的代码
BUG的讨论和解决过程可以看github上面这两个issue:
- /bus/refresh causes instances registered in Eureka Server disappeared #692
- Making POST on ‘refresh’ permamently deregisters the service from Eureka #1857
参考:
Config Server——使用Spring Cloud Bus自动刷新配置

微信扫描二维码,关注一个有故事的程序员
(点击了解: 关于程序员的专属导航!)
Post Directory